I needed a handmade gift that I could make for my cousin for Christmas. See we swap names each year and the rule is you have to make them something. My cousin is also a mechanical engineer and like me is always working on some project. He also regularly does his own car work.
Looking on Pinterest for ideas I came across several homemade lamps made from car jacks. I thought what a perfect gift for a mechanical engineer that also works on his car! Here are some of the posts that inspired me.
I decided to make it even more special I’d get the jack from his first car. His dad said his first car was a 1998 Chevy Malibu. Turns out you can get a used jack for any car it seems for cheap on ebay! About $30 later I had myself a jack from a late 90’s Malibu!
The first step was to get it as clean as possible. The jack had a little bit of sticky residue covering the entire thing. It also smelled like an ashtray. In addition to that the screw had some grease on it. I cleaned it as best I could using a brush and lots of degreaser. I took special care to move the jack through its range of motion to expose the entire screw so I could clean all the grease that I could get to. It would be important to have a nice clean jack because I planned to paint it at the end. I also cleaned off the used brake rotor I had selected for this project. First with brake cleaner and then with degreaser.
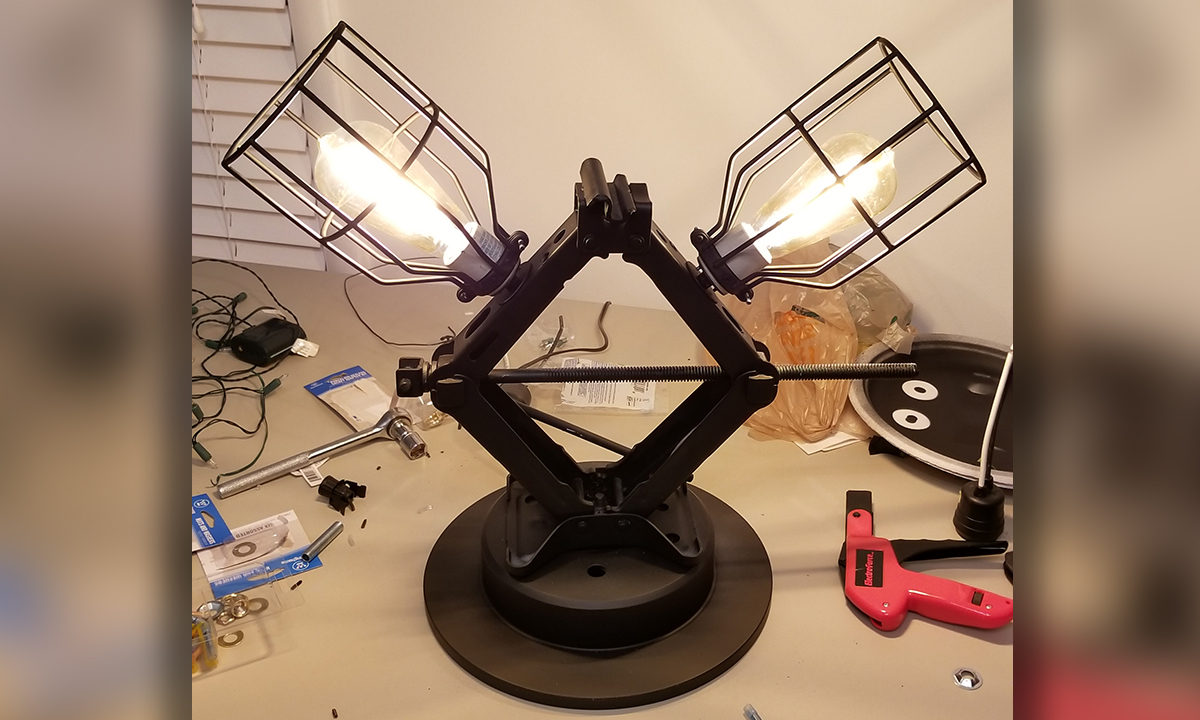
Next was to figure out my design. My initial thoughts were to put a lamp on the top, but this particular jack had a higher side and a lower side for each side of the pinch weld on the car. I decided instead to just put 2 lamps on it, one on each side sticking out at 45 degrees with the jack forming a diamond shape.
Next I was off to Home Depot for parts! I picked up a variety of options, some of which I was able to return unused. In the end though I think these are the major parts I used.
- Rustoleum Primer
- Rustoleum Flat Black
- Light bulb cages
- Vintage looking light bulbs
- Ceramic light bulb bases
- Lamp wire
- Threaded lamp tube/washer kit
- Large bolt, washer and nut to attach jack to brake rotor
- Used brake rotor (My mechanic was happy to donate to the cause)
- Black Felt
- Spray adhesive
The process to “design” the lamp was really just a bunch of trial and error. I had a few different lamp bases for example that I tried before selecting the ceramic ones I ended up using. I also had a few different cages. Basically I just had to try different options to see what fit and what didn’t and what gave me the look I was going for.
Once I had the basic design down it was time to get it all wired correctly. I wired both sides together so that the roller switch on the cord would turn both on at the same time. During this process I had to attach the jack to the rotor because I had to run the wiring and attach them together at a certain time to get all the components to fit right. Again, if you’re tackling this project you’ll just need to assess as you go. Also make sure to have the cord coming back out of the top of the rotor. If you have the cord run under the rotor the lamp won’t sit flat.
Once it was all together I prepped for paint. While everything was already clean I now needed to mask certain parts to protect them from paint. I put masking tape on the insides of the sockets to protect them, but not the outsides which I wanted to paint. I was careful to mask most of the cord that went away from the lamp. If I had painted that portion the paint would likely just crack off in use as the cable is bent. I also painted the cage parts separately. This allowed for a more thorough paint job on the bulb mounting sockets as well as the base of the cages themselves.
Painting was fairly straight forward. I use Rustoleum Professional line for all my projects like this. I find that the primer/paint combo sticks super well and gives a really nice smooth look. I use this stuff on the skid plates of my Xterra and am shocked how well the paint stays on. Anyways, I suspended it from a hoop made from bailing wire for painting so I could get to all sides of it easily. Throughout the priming and painting step I made sure to try and get inside all the random surfaces all over this thing. You want to make sure to get all the inside surfaces of the jack as well as the cables hidden inside them. Also make sure to get all the surfaces of the jack screw. I put a lot of effort into this and kept finding small spots I’d missed. Don’t rush this step. In the end there were still one or two spots with a hint of primer showing through but I was pretty pleased with it overall.
The final two steps are really the polish on this project. The first was adding a felt pad to the underside of the brake rotor. Look at any lamp and you’ll see this. It protects the surface that the lamp rests on. The other special choice was my choice of lightbulbs. I found these cool vintage looking LED bulbs that I thought really gave it that steampunk look that I had in my mind. The light is very yellow but for this project I was stoked at the pop that the bulbs brought to my project.
My cousin was super pleased with the gift. He told me that his car actually never had the jack that was supposed to be in the trunk. He of course discovered this unfortunate fact in a time of need! He has since built a custom desk out of some really old buried wood and the lamp takes prime real estate on the desk. I guess he liked it!

