Whether you do gas, glow or electric fueled vehicles you still need a battery charger. And with today’s high performance Lipo’s it’s getting even more important to have a quality charging solution. Several years ago as I prepared to buy my HPI Savage Flux HP, a vehicle which would need two 6000mAh batteries at the same time I realized I was going to need to buy a serious charging solution.
Unfortunately a high output charger is only as good as it’s power supply! Looking at the prospect of purchasing a $600 vehicle plus big honkin’ batteries I was not super interesting in overspending on a charging solution. I decided to purchase the Hitec X2 Ultima Dual 200 Watt battery charger. It could charge 2 batteries simultaneously at up to 10 amps each. On the batteries I was purchasing that wasn’t even a 2C charge rate! I would need a power supply that could keep up, but the ones commercially available were all $100-$200!
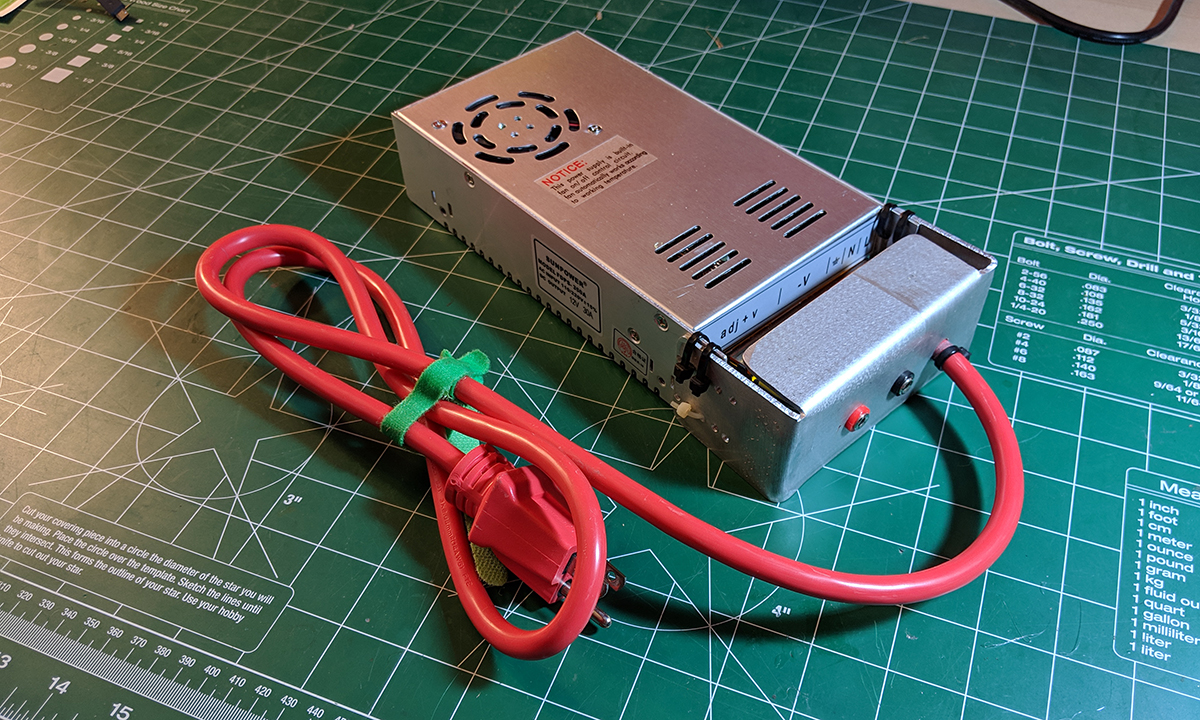
I decided there had to be another way and started lookout outside of the normal R/C vendors. Sure enough I found the Sunpower FDPS-350A. While it’s not pretty this is a quality lab style power supply that could output 12V at up to 30A! Better yet I could get it for less than $50 on eBay!
The only downside to this charger was that it wouldn’t have easily accessible banana plug ports to plug the charger into and there is no built in power plug. No problem. For the amount I was saving I figured I could just add a bit on the end with the proper wiring to make it similarly functional to a commercial power supply that cost 2x-4x as much.
The supplies I needed for this project included the following:
- 12V 30A Power Supply (this one is similar to the one I used)
- 4mm Banana Jack Receptacles (similar to the ones I used)
- Scrap aluminum sheet metal
- 14/3 Extension Cord (used damaged one I had)
- 12 gauge wire (stranded, black and red)
- Crimp on wire terminals
- Zipties
- Heat shrink
- Soldering iron, solder, heat gun, and crimp tools
I didn’t do a fancy CAD design on this one. I just headed into the shop with the parts and made something work. I will cover some of the key parts of what I did though which has helped it last years of use.
First of all, make sure that the switch on the side is set to an input of 115V. Additionally if you’re not comfortable working with electrical devices, specifically A/C ones, then maybe this isn’t the project for you. It’s not a difficult project but if done wrong there is a risk or shocking yourself.
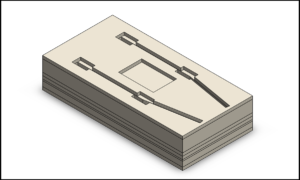
My first thing I did to make this easy was to add arrays of holes down each side of my sheet metal bracket. I wanted to just ziptie the bracket onto the front of the power supply through slots already on the power supply. By adding several pairs of holes I was able to make it as compact as possible without feeling constrained because I had only made one set of holes too close to use safely.
Regarding the cords connecting from the bracket to the plugs/wire that took a little research. The power cord attaches to the right right three terminals. The ground is the green wire from the extension cord, the white goes to the N, and the black wire goes to the L. Note that for me I was able to find an old extension cord that had one end damaged. So I cut the bad end off and was able to essentially make a cord to the length I wanted. I put it through the hole in the sheet metal and then stripped the wires back and attached terminals onto them. Had I attached the terminals on first I wouldn’t have been able to fit them through a hole the size of the cable.
The banana jacks are even simpler. First I installed the two terminals onto my sheet metal part, then I soldered red and black wire onto them. Next I made to sure to cover the solder job with heat shrink. The final step was to attach terminals on the other ends of the wires and attach the wires to the power supply. The power supply has 3 positive and 3 negative terminals which were labeled clearly. I chose to connect my banana jacks on terminals a few screws apart.
Once all 5 wires were installed I did one extra step which I think is pretty important. You want to make sure to strain relieve your cables so you can’t accidentally tug on them and damage something. The banana jack cables are hard mounted on each end, and fairly well protected in between. However the extension cord just goes through a hole in my bracket. To keep you from being able to yank the cable and damage the electrical connections I put a ziptie on the orange outer coating of the cable on either side of the bracket. This way if it does get yanked it doesn’t go far and the stress is never put on the electrical connections themselves. Also by limiting movement through the hole I can reduce wear to the cable from abrasion.
Once everything was electrically connected and strain relieved I attached the bracket onto the enclosure with a handful of zipties. The various holes allowed me to get the spacing just right.
The last tip I’ll make regarding this project is to get a proper carrying case for everything. I went out and bought a small toolbox that can hold my power supply, charger, and all the various different leads I need to attach batteries to the charger. I put the power supply and charger in the bottom surrounded by old t-shirts for protection. This has worked well for several years and all the components still look like new!
Disclaimer: I participate in the Amazon Affiliate program. By purchasing items listed on Amazon using the links on this website you are supporting this website. I received no compensation for listing or using any of the products linked to on this page.
