I recently finished a small project that I think others might like to replicate. For Christmas each year my extended family exchanges names for a gift exchange, but the gifts we give must be custom gifts rather than store bought. This was also the inspiration for my Custom Car Jack Lamp that I made a few years ago. This year I had another cousins name and after much back and forth with his fiancé I landed on the idea of a wine rack for their apartment.
I looked to Pinterest for inspiration and came upon another bloggers wine rack that I thought had the right style and would fit their form factor well. Check out her blog here. I largely took her idea as inspiration but modified it slightly due to the materials I had available to me and the maximum dimensions given to me by my cousin’s fiancé.
My design requirements were the following:
- Maximum dimensions of approximately 19x12in
- Hold at least 7 wine bottles
- Look good on the shelf in their apartment (wood, stain, finish selection)
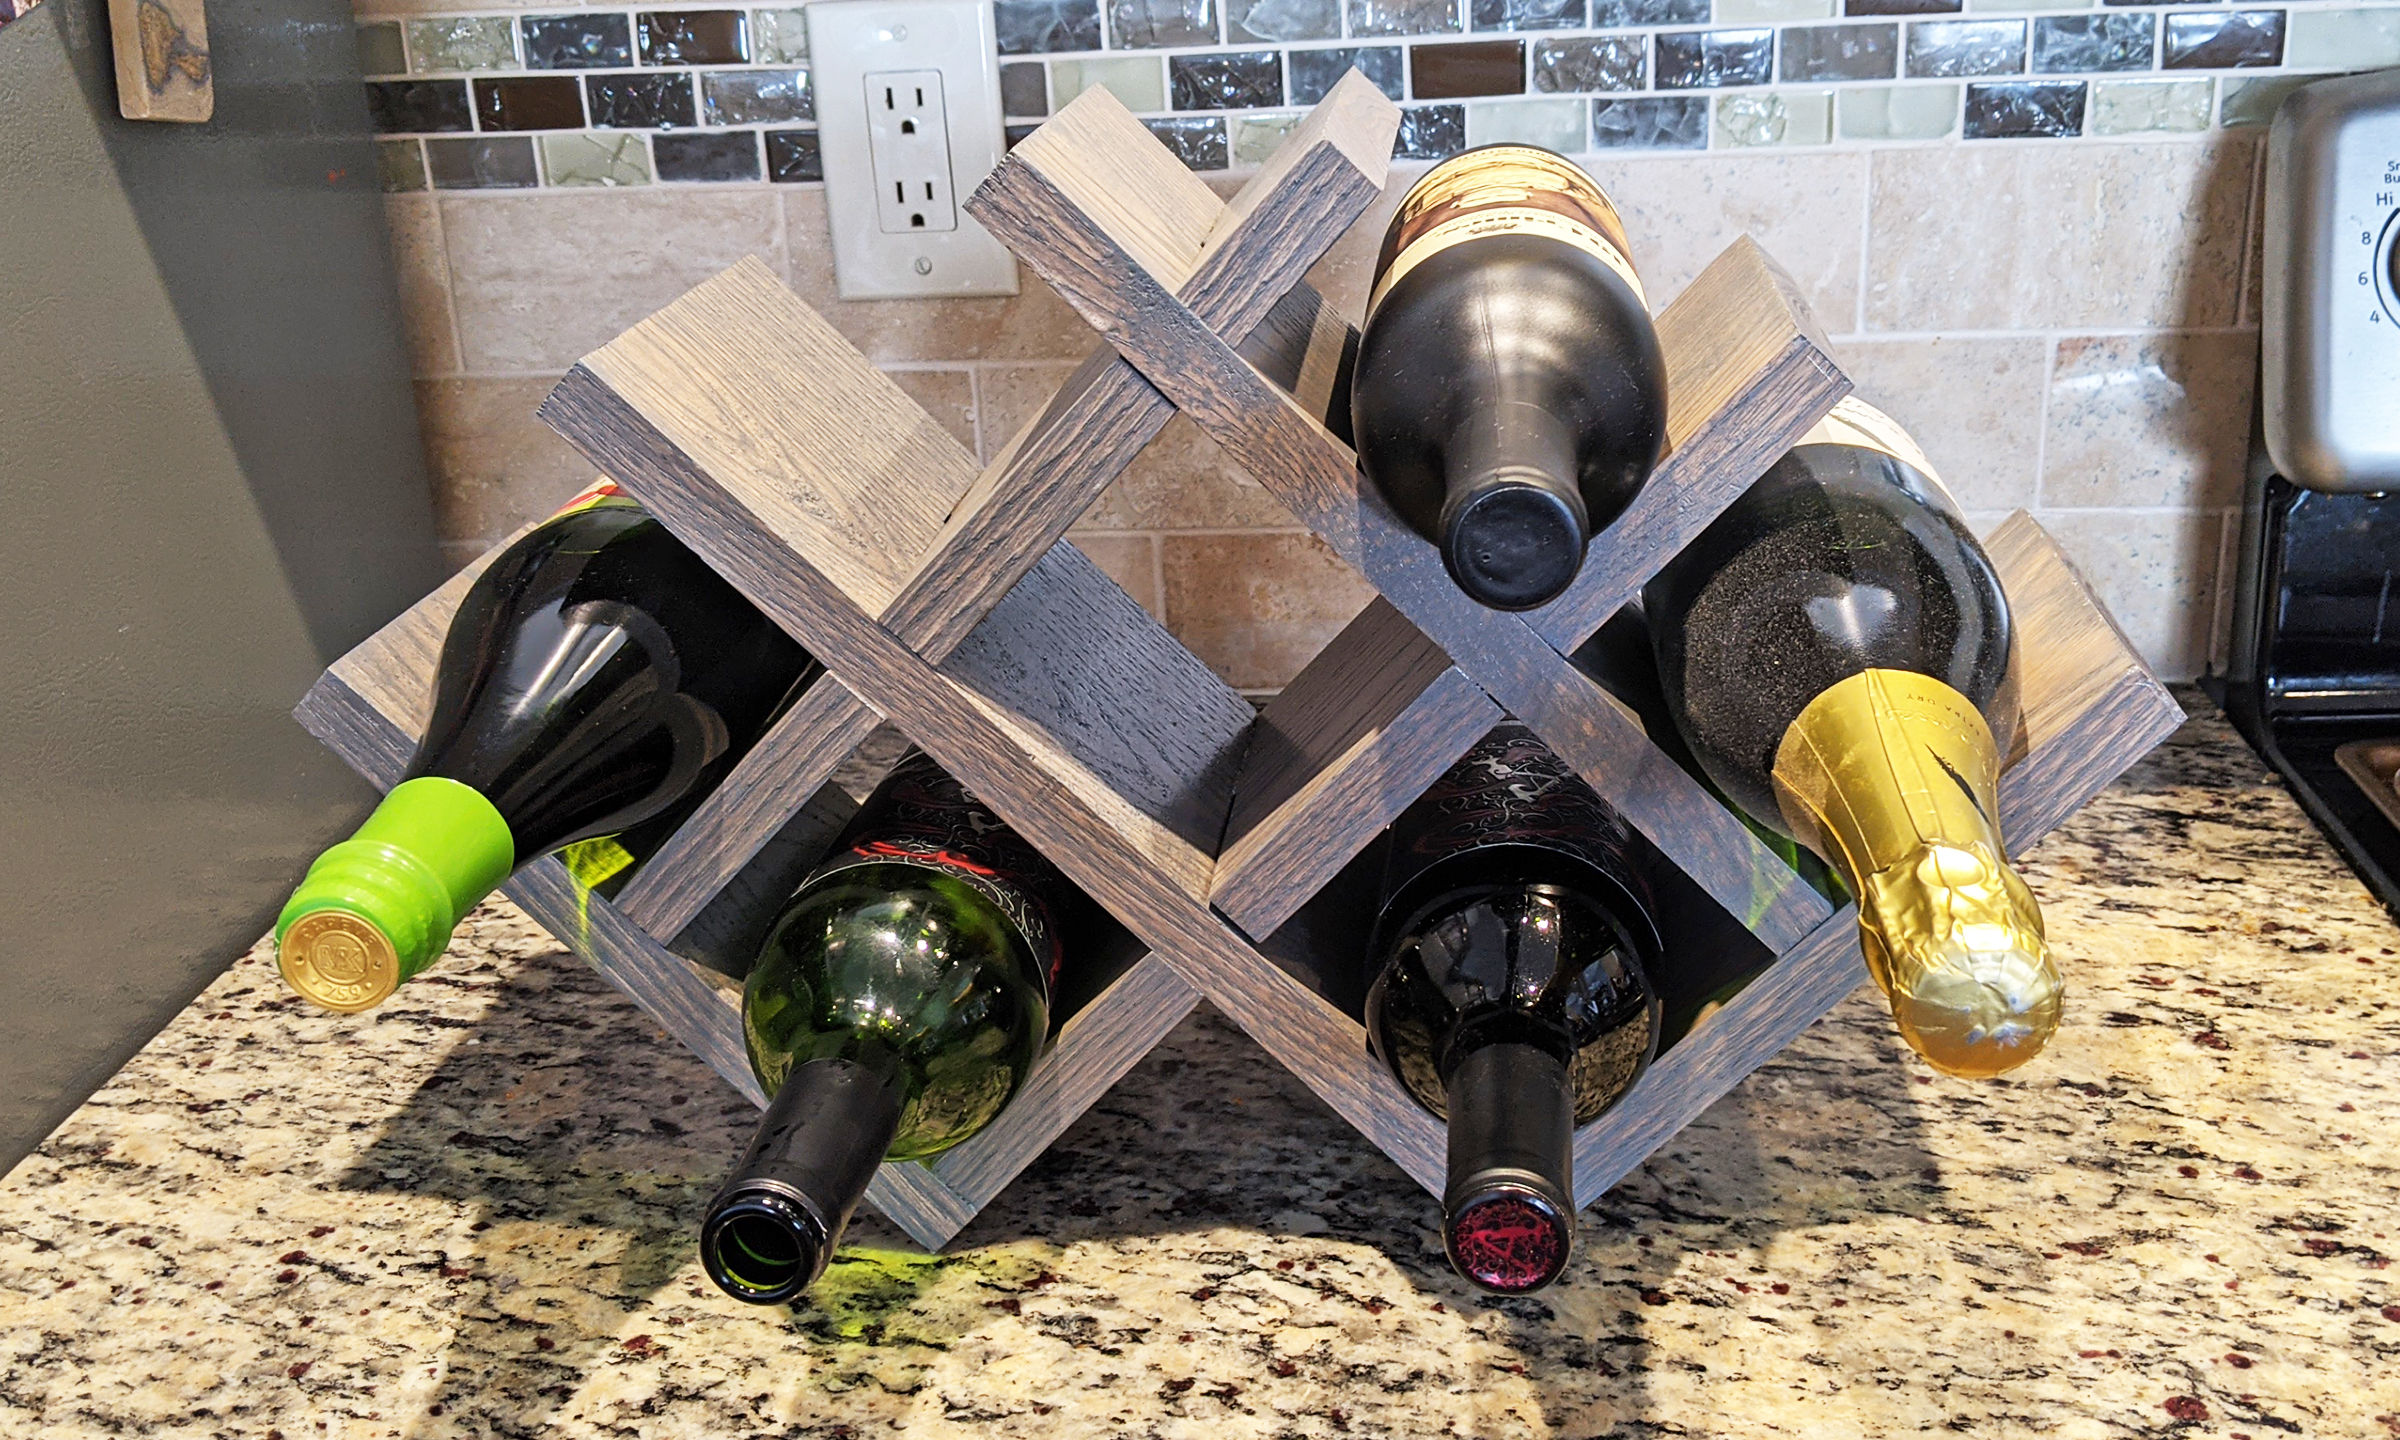
I chose to make it out of oak for the added wood texture this would offer. Locally 1×6’s were available in oak so that’s what I used. I left the boards 5.5in deep and 0.75in thick. While the marking and cutting process shouldn’t have been too exciting I did actually get injured doing this project.
After cutting all the pieces to length on a wood chop saw I began cutting out the slots. I was using my father-in-laws brand new Rockwell Blade Runner X2 Portable Tabletop Saw which is basically just a jigsaw blade attached to a jigsaw with a tabletop. After cutting a slit into the wood I went to back the blade out and it got wedged into the wood and rapidly hammered my finger repeatedly between the wood and table before I could let go. The injury is just now finally healed nearly 2 months later. I later figured out the reason for this mishap was that the wood warped a little after being cut and so my slot pinched back closed behind the blade as it cut. As I backed the blade back out at the cut slot I just wedged it into the narrower slot in the wood. I won’t share the pictures of my finger here by did want to give a warning about using this type of saw. Had I managed to let go faster or maybe not been using hardwood my injury might have been reduced. Later I chose to finish cutting the slots out with a combination of the chop saw and a bandsaw which in hindsight was probably much safer.
Back the project at hand though I think I’ll let my model and drawing speak for themselves regarding my final design. Overall the cutting and marking was fairly simple and straight forward. One place I deviated from the inspiration blog post was just how I made the ends of the slots. Instead of chiseling the ends of the slots square with a chisel I just came at the end multiple times with a bandsaw eventually removing all the material I needed to remove. The end wasn’t perfectly straight but that’s fine since it’s hidden once everything is assembled. I also didn’t have a chisel that specific size and was a little concerned that my choice of oak might split more than her chosen material of pine. Chiseling the oak also seemed like it would be more work than chiseling out the pine.
In hindsight the one thing that I should have done that I didn’t do was sand all the pieces thoroughly at this point. I used sanding sponges to smooth the cut edges and address a splintered area or two but the boards seemed fairly smooth and so despite reading that was a suggested step before staining I did not do it. I think that resulted in a few high spots which were slightly perceivable even after staining and polyurethane. Based on several online sources (like this one) for my next project like this I’ll sand with a 120 grit and then a 150 grit sandpaper. This is specific to my application of an oil based stain on hardwood though, so select your finishing prep appropriately for your project.

I applied 3 coats of Varathane Weathered Gray stain to each piece before assembly. I chose to apply it with a rag being careful to consistently allow it to stain for 3 minutes per application before wiping it off. Once that was done I assembled them together by clamping the parts together in the right configuration and then drilling and nailing the far outside pieces on. I found that the hardwood would split without a pre-drilled hole. This was due to it being a hardwood and the nail being so close to the end of the board. Your results could vary, but I used a 1/16in bit for a 16 gauge 1.5in brad nail and it worked well.
Note that my attachment method technically does not attach all the pieces to each other. Functionally I just made 2 interlocking U-shaped assemblies. However once the nails were in place and the clamps removed the assembly held together firmly. This was a due to the slots being fairly well sized for the board thickness going into them and the minor warp in the boards that pressed them into each other slightly. I figured this was held together well enough considering the final polyurethane coat would kind of glue it all together.

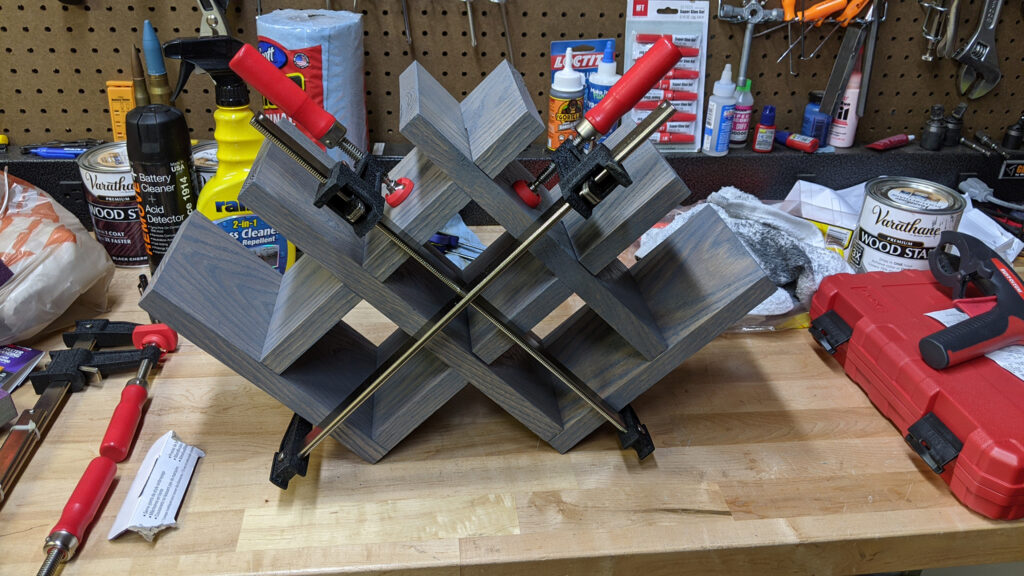
Next I applied 3 coats of Varathane satin water based polyurethane to the whole assembly. I had to do this 6 times total, applying 3 coats to most of it and then flipping it over and getting 3 coats on the spots I couldn’t get in the first setup. I applied this with a foam “brush” with fairly good results. Just watch out for drips!
The final step once it was all together, coated, and dried, was to confirm it sat straight. Sure enough there was a slight wobble when positioned as it will be used. This was probably due to not perfectly aligning things when nailing them together and/or the slight warp in the wood. I chose to just shave down part of one of the bottom edges until it rested flat on the table and no longer wobbled.

This was a really fun little project and I was proud of the finished result. Thanks April Wilkerson for the inspiration (again check out her blog here). In fact it inspired me to tackle another wine rack project for my own home. More on that soon hopefully.
Below is a list of the tools and materials needed for this project.
Tools/Supplies:
- Saw (I recommend a chop saw and a band saw)
- Hand drill
- 1/16in drill bit
- Clamps
- Foam brushes
- Staining rags
- Orbital sander sandpaper (Need 120 and 180 grit)
- Sanding Sponges
Parts/Materials for the Wine Rack:
- 1×6 oak board, 6ft long
- 1-1/2in Brad Nails
- Varathane Weathered Gray Stain
- Varathane Water Based Satin Polyurethane

Disclaimer: I participate in the Amazon Affiliate program. By purchasing items listed on Amazon using the links on this website you are supporting this website. I received no compensation for listing or using any of the products linked to on this page.

Very nice!