What is an Automatic Video Editor?
I always collect lots of footage from my adventures and needed a way to put them together quickly into an engaging and entertaining highlight video. A few years ago I heard about automatic video editors. At the time nothing was really working that well, but I knew a day would come when it would.
That day is now!
I’ve been toying with a few different automatic video editors for a few months now and I have decided at this time that Magix Fastcut Plus Edition is the best one at the moment. To be clear, I’m not being paid for this opinion or otherwise sponsored to give it, this is my honest opinion based on my own experience. Also noteworthy is the runner up which is Magisto. Although I really liked this app, and it’s feature of automatically detecting the beats in music you select, overall I found the output not quite as good as Magix Fastcut Plus Edition.
So let’s cover what Fascut is and is not good for and what it is overall. Fastcut is a program that will automatically splice together images and video to produce an engaging video with little oversight needed. To be clear, this is not a full function video editor. It has one trick, and it does it well, but if you want lots of adjustment over your final product you’ll need to look elsewhere.
Now, regarding how automatic this software is, there is some customizability there. You have two options. You can either select media inputs and select one of the premade templates, and then just let it do it’s magic. This is by far the quickest method resulting in a video in under 5 minutes. The result is far better than I could do in 5 minutes with a traditional video editor, but it may not pick all of the best parts of your videos and therefore the result is good, but generally leaves some room for improvement.
Now the next option is a little more time consuming, taking me about 2 hours per video, but results in a video where you have much more control. I’m going to cover this method more below.
Before Opening Fastcut
There are a few things that bug me with the software and my process is tailored to work around these limitations. Those limitations are:
- The program gives you no useful way to sort media inside of a folder you select to use.
- Although you can load your own music the software does not detect the beats and instead just assigns a series of transitions at a fixed interval every few seconds.
- I wish the software would detect if you have more or less media and add or remove transitions from the templates accordingly.
- I wish the software made it easier to reorganize media once it is selected for your project.
So my process begins outside of Fastcut. The first thing I do is find all the media I want to use and put it into one folder. Next, if I want to have the media played in a certain order, I number each file with the prefix of what order it shall appear, or at least in batches. For instance if I’m going to have clips from multiple different locations and I want them to appear in groups of media from each location I’ll add “1-” to the beginning of all of the files from the first location, “2-” to the beginning of the 2nd location files, and so on. Once we’ve collected and ordered or media it’s time to open Fastcut.
Loading Media and Selecting a Template
Now we open Fastcut. When it opens you’ll be prompted with three options. Choose Create new video project.
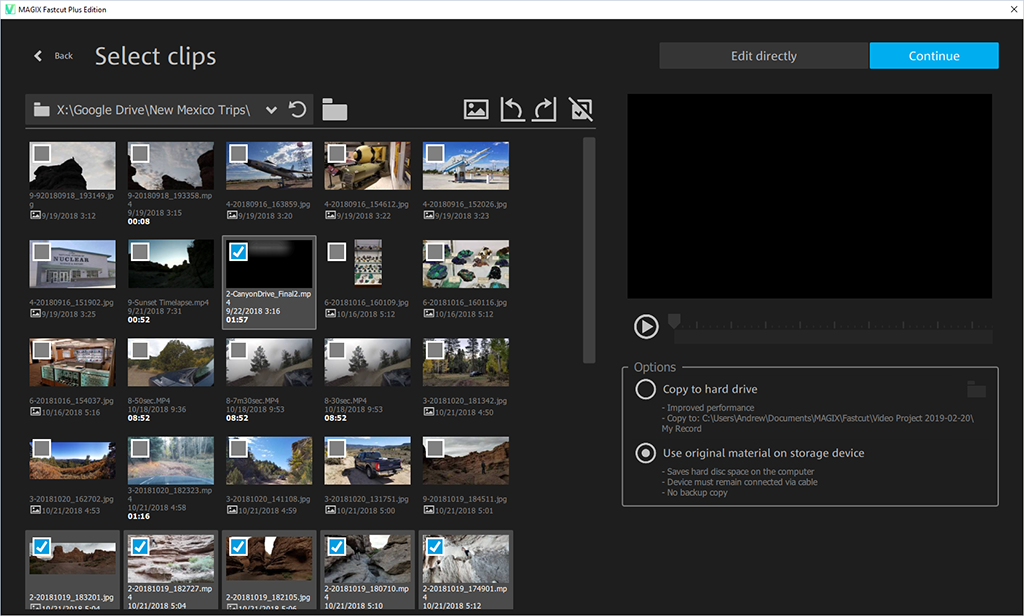
Next select the folder icon in the top left quadrant of the screen and select the folder that contains your media. Now here is the important part. Go through and select the media you want in approximately the order you want it to appear in your video. If you labeled the files with “1-” then it’s easy to find all the first clips you want in your video! As dumb as it sounds the files will be imported into the next step based on the order that you select them here so select carefully because it’s a pain to move a file from the end of the group to the beginning.
If you don’t care about the order and plan to randomize the media anyways then select them in any order you want. Once the media you want to include is selected click the Continue button in the top right corner.
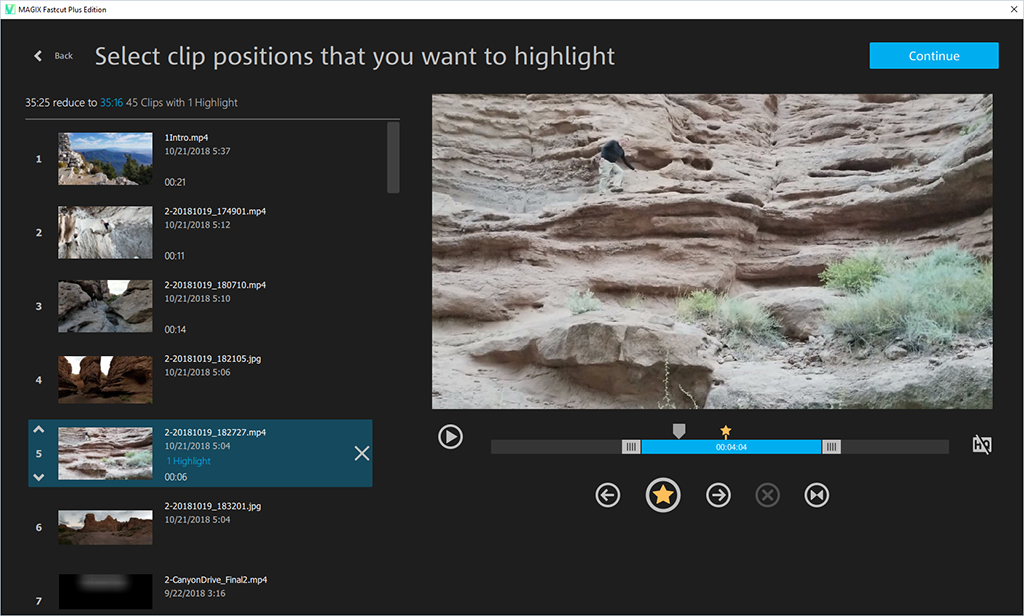
On this screen we’ll select the final order of our media as well as select the portions of each video we want to include. This is the most time consuming step out of the whole process, especially if your video clips are long. If you have no desire to select individual media segments or highlights then simply click Continue in the top right corner.
You really want to limit each clip to something around 5 seconds. Any longer and the results generally just don’t come out as expected. On each clip you have the option of selecting which portion of the clip the program will pick from by using the slides on the blue bar under the video preview window on the right side of the screen. You can also select highlights from within the video by using the star button.
Once you’ve roughly selected the portions of each video you want to use and selected highlights you can reorder the clips. Re-ordering is a pain because you can’t drag and drop as you’d expect. You must click the up and down arrows next to each thumbnail and it will move that clip/picture up/down one slot. This is fine for moving a few files around among each other but is tedious if you want to move media from the end of the list to the beginning. This is why numbering the files and selecting them in the right order is so helpful.
Once you’re done ordering, selecting video portions, and selecting highlights, click the Continue button in the top right corner.
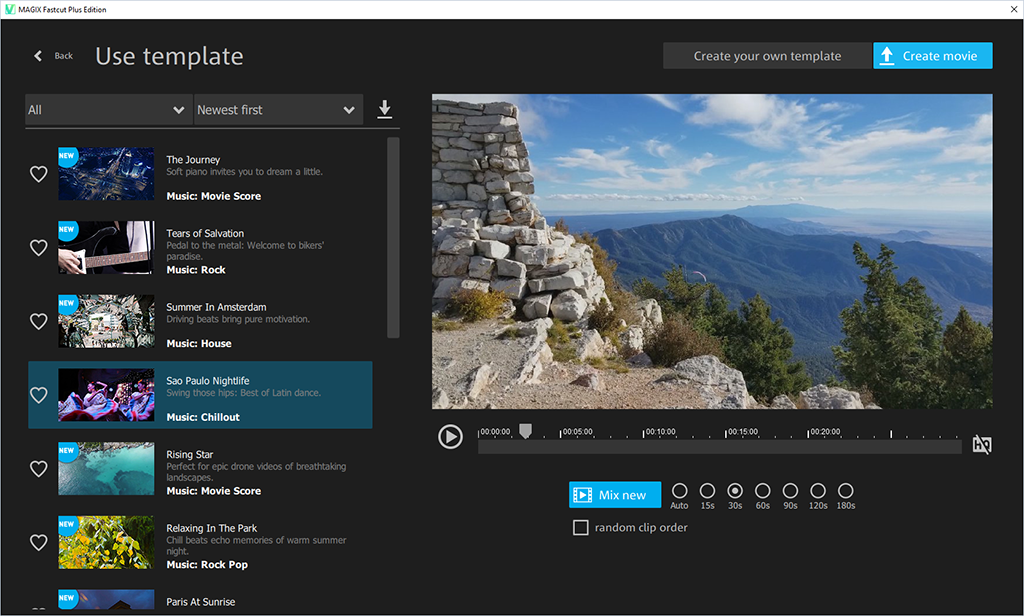
Finally we’ll select a template for our movie. The program has premade templates which feature different music styles and durations and has transition points already selected to match the tempo of the music.
Click through the different options and watch the pace and transition styles of each template to select one you think will work for your project. Note that some templates will only work with shorter videos and so the 120s and 180s options (under the video preview window) won’t be available. If you want a 2-3 minute video this is something to keep an eye on while selecting a template.
Once you have a template you think might work select the Apply Template button under the preview window. The software will work its magic and make a 30 second preview of a video using your media. If you don’t think it quite works you can select another template and repeat the preview process.
Note that I’ve mentioned a few times that you might not care about the order of the clips and pictures. If this is the case you can select the Random Clip Order button which will randomize the media when it creates the final movie.
Once you have a template you like make sure to select the duration of the video you want under the preview window. Then click the Create Movie button in the top right corner of the screen!
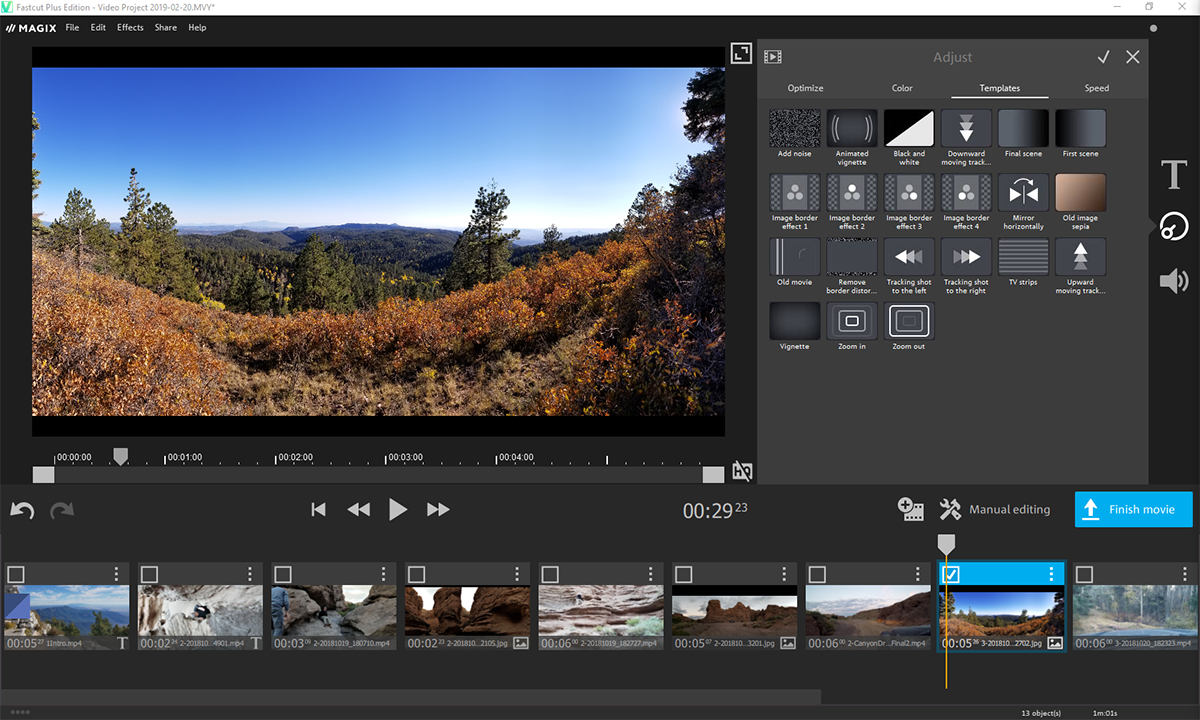
Final Editing
Once the video is done being processed a window will pop up giving you a few options. If you want to just take the video as is then select Save on your computer, Export to a mobile device, or Upload to the Internet.
If you’d like to edit it some more though, maybe add a title, add image stabilization, or correct some color issues, then select Edit more.
From this screen you now have numerous options to control the final output of the program. You can select individual clips and make the following changes.
- Adjust the segment of the input video that is used by moving the blue bar at the bottom of the video preview window
- Add image stabilization to individual clips
- Rotate video clips and images
- Apply color correction to individual clips and images
- Adjust the transition effects between clips
- Add a title or end credits
Once everything is to your liking select the Finish Movie button on the right edge of the screen and select the location for the file to be saved. The rendering process can take several minutes so be patient.


Final Thoughts
I’ve found that this program does a pretty good job at what it’s designed to do. If you put in several really short clips from say a birthday party, along with a few pictures, it can automatically splice them together in a fun and engaging way. The output video really can take just a few minutes to create to share.
But on more complex projects with tens of files, possibly of longer length such as those likely to come from an action camera, the program struggles to produce something automatically that is as rewarding. However with some effort put into selecting the right clips and segments of clips, and making final adjustments at the end, the end product is really stunning. And best of all, it really does remove all the tedious work associated with timing the transitions to make an engaging video.
I have found this program to be a great tool for many of the videos I’ve made. However there have been times when I’ve felt limited because I wanted some feature that could only be found in a more full-function video editor. So while this is a great tool for highlight videos it is no replacement for a full-function video editor at certain times. I recommend this product for people that want to make highlight videos and either don’t have the time or skills required to make those videos using traditional video editing software. While this program has room for improvement it is very functional in its current state and I strongly recommend it!
Videos Created with Fasctcut Plus Edition
Here are just a few of the highlight videos I’ve created of recent trips using Fastcut Plus Edition.

